Got News?

How to Access Full Version of Facebook on Mobile 0 386

Facebook Full Version From Mobile

Technology has helped us to be selective and to have full control over how we want to use different services. And as long as the user experience is concerned, the tech companies ensure users get exactly what they need. Surely, Facebook is not excluded from this club. The company, starting its journey in 2004, has been constantly working to provide unique features to its users. As a part of that commitment, it has allowed users to access Facebook in several ways. But we all don’t know how to access full version of Facebook on mobile.

Some people like to use Facebook’s official app whereas others find the desktop version more user-friendly. Each has its own benefits.

For instance, Facebook’s mobile app has nicely in-built features that do some tasks brilliantly; going live, giving check-ins, uploading photos instantly, interacting in groups and so on. On the other hand, the desktop version allows you to explore full features of Facebook such as more selective features in terms of privacy and more in-depth customization to profile.

How To Access Full Version of Facebook on Mobile

Browser-specific method

This is a popular trick to get full version of any website. In almost all popular browsers such as Chrome, Firefox or Safari, there is a built-in option called “Request Desktop Site”. Enabling this option will help you log in full site of Facebook easily. However, depending on which browser you are using, there should be different steps to access that particular option.

  • Chrome

Chrome is undoubtedly one of the most used browsers around the world and as far as the user experience is concerned, they never compromise. With easy-to-use and customizable features, it ensures users have full control over what they want to do on internet.

To log in desktop site of Facebook, chrome has “Desktop site” feature in it. To enable it, you just need to follow these steps:

  • Open Chrome on your mobile
  • Click on three dot sign on top right corner of the browser
  • There you can see an option called “Desktop site”
  • By clicking that option, you can easily enable it if it is not already enabled.
  • Now you go to facebook.com or www.facebook.com just like you would do any other time.
  • Enabling that option, now you should be able to view full site of Facebook

The steps are same whether you are using it on Android or on iOS mobile phones.

  • Firefox

Firefox Is another popular browser among the users globally. With its privacy-related features, it has gained a strong position in the internet community. So to log in Facebook full site, it is just as easy as it is on Chrome. We will quickly show you the steps for Firefox here:

  • Open Firefox on your mobile
  • Click on three dot sign on top right corner of the screen
  • There should be an option labeled as “Request desktop site”
  • Click on it so that it is enabled
  • Now visit www.facebook.com and you should be able to log in home page of Facebook’s full site.
  • However, remember to type “www” in front of the URL, because typing only facebook.com will redirect you to the mobile site.
  • Safari

               If you are an iPhone user, chances are you are very used to Safari browser. It is another popular browser like Chrome and Firefox. With a few steps, you can also get the full version of Facebook just like you would see when you log in through your desktop computer.

  • Open Safari browser on your mobile
  • Go to Facebook.com
  • Now hold the turning-arrow-shaped button or reload button for a few seconds
  • You should see an option which shows “Request Desktop Site”
  • After clicking it, Safari will provide you the desktop view of Facebook.

However, while following this method, you should keep in mind that when you are enabling “Desktop version”, the websites you visit will be shown in desktop view, not just Facebook.com. So, you might want to consider following the next trick that we are about to reveal now!

How to Access Full Version of Facebook on Mobile
Facebook Web Version From Browser

The Universal Trick!

In this method, you do not need to worry about downloading a specific browser on your mobile or changing from mobile version to desktop view from the setting. By following a few simple steps, you can view full site page of Facebook.com easily no matter what mobile or browser you are using.

  • Open your preferred browser. It can be Chrome, Firefox or Safari or any browser you want
  • If you are already logged in Facebook, type www.facebook.com/home.php
  • Make sure you put “www” in front of Facebook.com, otherwise, it will redirect you to mobile version of Facebook automatically
  • If you are not logged in Facebook, this will not work. So, first you need to log in to your account and then try these steps

Nevertheless, opening full Facebook page on mobile can be tiresome as well because it is bulky, takes some extra time to scroll and the pages are zoomed out which may seem unappealing to some people. I hope you got now how to access full version of Facebook on mobile. However, if you wish to ditch the Facebook app and want to experience full site of Facebook.com, we already mentioned the ways!

Previous ArticleNext Article
Tech Enthusiastic, Gadgets Freak & Traveller! Love Writing on Technology & Travelling Stories.

Leave a Reply

Your email address will not be published. Required fields are marked *

How To Solve DNS Server Not Responding Error On Windows OS 0 324

DNS Server Not Responding error is the most common issues we have on our Windows computer. When we get this error what happens is we cannot connect to the internet. There can be many reasons why this DNS server issue occurs. By using Windows Network Diagnostics tool from the control panel of windows if we try to solve or troubleshoot this problem it will give a notification or pop-up message saying- “Your computer appears to be correctly configured, but the device or resource (DNS server) is not responding” or ” something your DNS server might be unavailable. “

First, we need to know what is a DNS? 

In simple words: Domain Name Servers (DNS) are the Internet’s equivalent of a phone book. They maintain a directory of domain names and translate them to Internet Protocol (IP) addresses. This is necessary because, although domain names are easy for people to remember, computers or machines, access websites based on IP addresses.

Now comes what is a DNS Server?

DNS server is any computer registered to join the Domain Name System. A DNS server runs special-purpose networking software, features a public IP address, and contains a database of network names and addresses for other Internet hosts.

DNS Server Not Responding


There can be many reasons why this occurs. This is mostly seen on windows 7.  Though I never saw DNS Server issue arising in Windows 8/Windows 8.1 or in Windows 10 for that matter. Mostly we see this when we have no internet and it can’t intercept with the network. But it can arise in your ones. So if it arises it can be a lot of pain if you don’t have knowledge of this and you don’t know how to solve this type of issues.

The main reason this error occurs is either there is a problem with your DNS setting means it’s corrupted or the firewall that you are using is blocking the DNS. So, it’s not been able to communicate with websites and return results.  In this troubleshooting tutorial, we will show you the all the ways so you know how to solve or fix DNS Server is Not Responding error on your windows computer or OS. There are other types of DNS error that can occur like DNS probe not finished no internet error or so.

How To Solve DNS Server Not Responding Error On Windows

Here are the easiest ways of solving this DNS error issue on your Windows OS. To be honest it’s very easy and simple anyone can do it. You can just follow our troubleshooting and do it yourself.

Method 1:  Check Your Router Setting & Restart


So The first method to solve this DNS server error is what you should always do when you have any kind of internet connection related problem. That is checking the router settings. If that’s ok and everything is as it should be. Now just remove the power cord adapter from the router. After all the light goes off the router is gone and you are sure it’s turned off reconnect the adapter with the router and restart the router. You should wait 10-15 seconds for safety after removing the cord. Now check to see if the DNS error is solved if not then move on the method 2.

Method 2: Method 2: Re-Configure the TCP(Transmission Control Protocol )/IP(Internet Protocol) settings


Configuring the TCP/IP is a bit tricky process. You have to follow few steps to do that. Just continue with us and do as the screenshots we attached. It will be a no headache for you and solve DNS server not responding problem on your computer.

  • From your Taskbar Click Start Menu, and then go to Control Panel or from start menu Right-Click of your mouse button and choose Control Panel in Windows 8 and Windows 10.
your dns server might be unavailable
DNS Server is Not Responding
Control-Panel
  • Click Network and Sharing Center. If you don’t find this menu just change the icons from small to large or from category to large.
What is DNS Server
  • Now click on Adapter Setting.
Change-Adapter-Setting
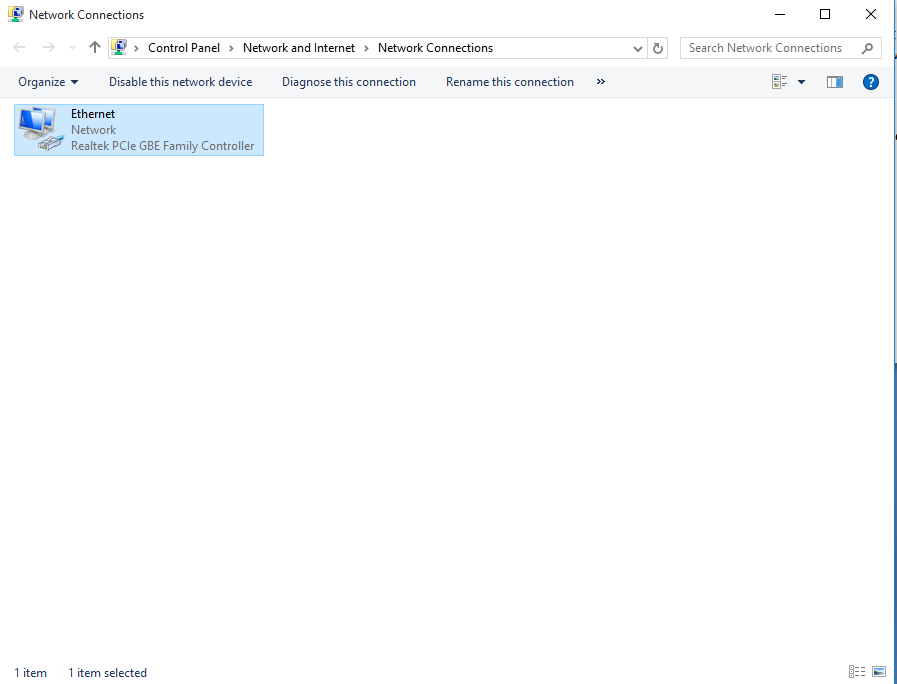
  • There you enter in a new page which will show Local Area Connection or Ethernet.
What is DNS
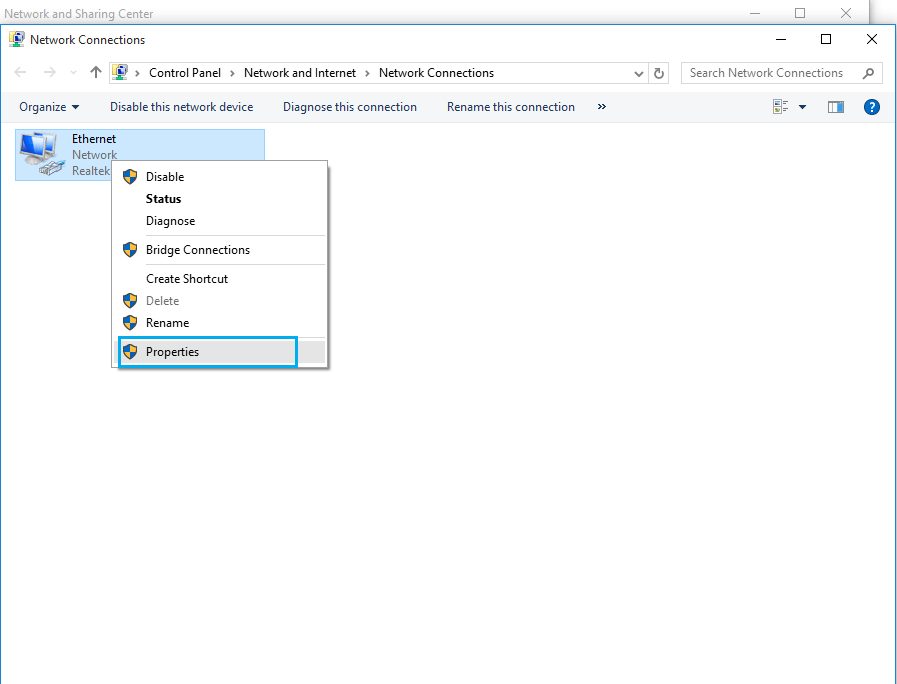
  • Now Right-Click on LAN or Ethernet and go to Ethernet Properties.
Solve DNS Server Not Responding Error
  • Now select Internet Protocol Version 6 (TCP/IPv6) from there, and click Properties.
Solve DNS Server is Not Responding
  • Then select Obtain an IPv6 address automatically and select Obtain DNS servers address automatically from there press Ok. Tick Validate upon Exit .
Solve DNS Server is Not Responding Error
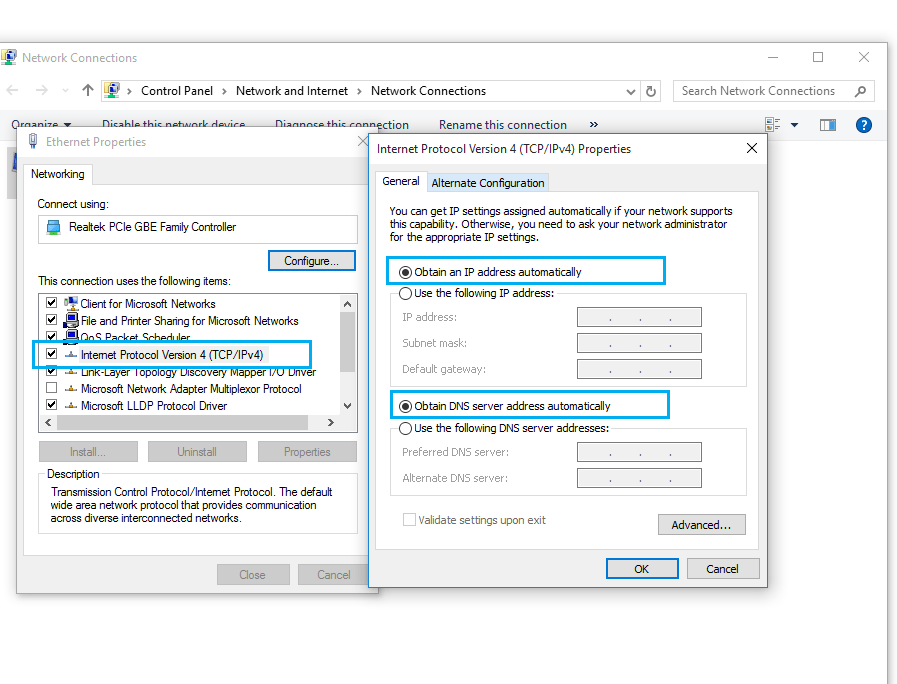
  • Now again go back to the Ethernet properties menu and select the Internet Protocol Version 4 (IPv4) and Select Properties.
IPV4-Properties
  • Now do the same for this one as we have done for IPv6 to obtain DNS server and address automatically. Check Validate upon Exit .
Open DNS

Also, you can do is type in the Google’s DNS or Open DNS in the DNS Box.  So for doing that Type in 8.8.8.8 and 8.8.4.4 which is Google’s DNS in the use following DNS Server address. As for Open DNS 208.67.222.222 and 208.67.220.220 . If you do not want to use Google’s DNS or Open DNS there are third party DNS server available as well which you can use.

Google DNS

Now this should solve most of the DNS Server not responding error for all the Windows OS. So check whether your problem is solved or not. If not then move on to the 3rd and last method.

Method 3: Using The Command Prompt Tool & IPConfig To Solve DNS Server Not Responding Error


In this method, we will flush the IP by using Command Prompt tool and command lines to solve the DNS server not responding error. Just follow the below step to complete the process.

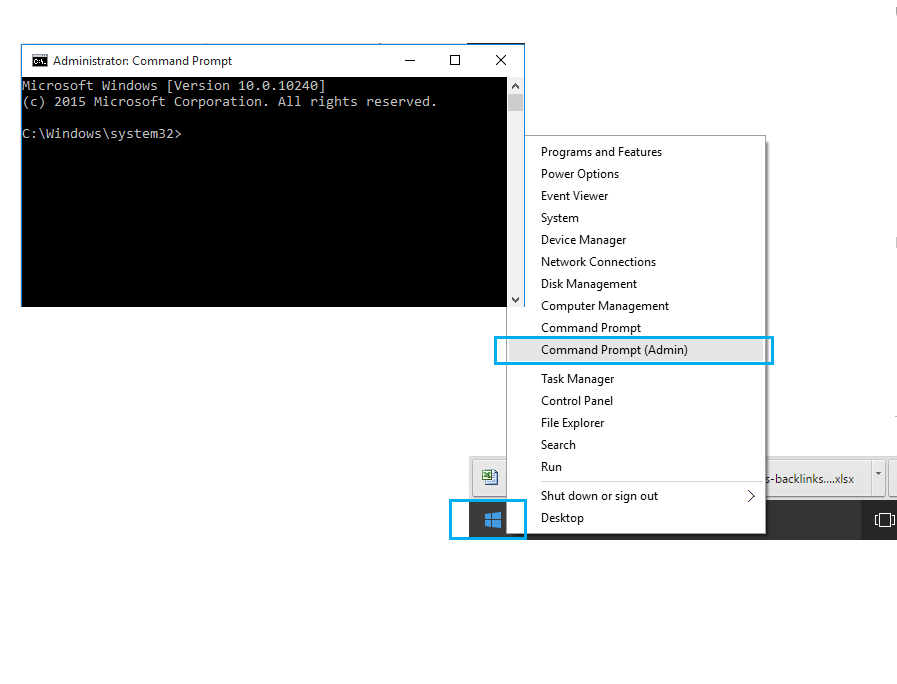
  • First Right-Click on the Start Menu, and you will see Command Prompt (Admin) menu pop up, Select that.  This should open a black and white box where you can write the commands.  You can also press Windows Key + R for shortcut method and type CMD there to open Command Prompt.
How to Solve DNS Server is Not Responding

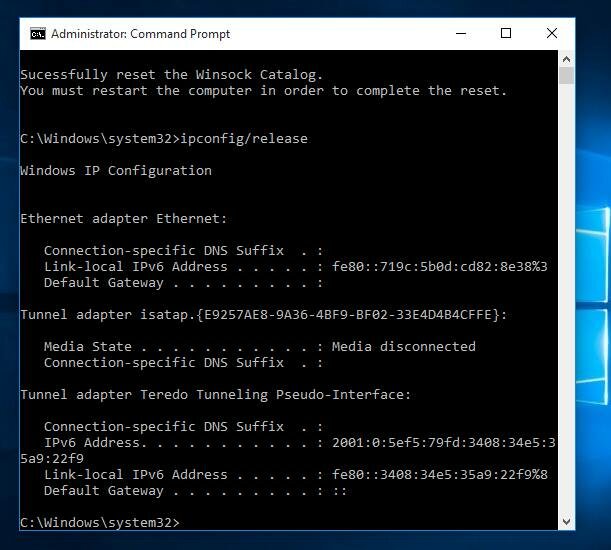
So type the below commands in the Command prompt box and after each command is finished press enter to execute the commands. We showed this in several command prompt for easier understanding. But you have to type them all in the same one and one after another. After every command press enter to execute.

Command-Prompt-DNS-Flush
  • ipconfig /flushdns  [Press Enter]
  • ipconfig /registerdns [Press Enter]
  • ipconfig /release [Press Enter]
  • ipconfig /renew [Press Enter]
  • netsh winsock reset [Press Enter]

What it did was flushed your DNS and registered it and again released it and then later renewed it. So now restart your computer and it should solve the problem.

If you type ipconfig /all in the command prompt. It will show you all the details of your ip and physical address.

There you will see Ethernet adapter Ethernet and under that Physical Address 94-DE-80-2A-2E-37. So now go back to the network setting and sharing Click Configure and then Advanced tab. Then Network Address. Fill in the value with your physical address without dashes. For example, if your physical address is 94-DE-80-2A-2E-37, so you will type 94DE802A2E37 and click OK. Restart your computer. This is a bonus method for solving the issue.

Fix DNS Server is Not Responding

Final Verdict

These are the methods available out there to solve this DNS server not responding error. I hope this solved your ones too and If you have any problem when following the steps mentioned in here please do inform us we will help you the best way we can. Another thing is if you know any better method to solve this problem please share with us so we can update our tutorial for everyone.

Most Popular Topics

Editor Picks

How to Access Full Version of Facebook on Mobile